Themen und Skins für Handy Smartphone und PDA selber erstellen
Heute möchte ich Ihnen zeigen, wie man eigene Hintergründe und sogar ganze Themen mit freeware erstellen kann. Das brisante Thema "Apple" lasse ich "natürlich" aus...
Speziell für Smartphone-Nutzer gibt es auch eine freeware, um sich sein Thema nach Bedarf zusammenzustellen (incl. plug-ins). Dieses kostenlose Programm sowie ein weiteres, mit dem man auch das Start-Menu personalisieren kann, habe ich Ihnen in dem newsweek-Spezial "kostenlos Programm-Launcher Task-Manager Start-Menue anpassen und home-screen (Themen) erstellen - freeware für Smartphone" (interner Link) vorgestellt.
Speziell für Smartphone-Nutzer gibt es auch eine freeware, um sich sein Thema nach Bedarf zusammenzustellen (incl. plug-ins). Dieses kostenlose Programm sowie ein weiteres, mit dem man auch das Start-Menu personalisieren kann, habe ich Ihnen in dem newsweek-Spezial "kostenlos Programm-Launcher Task-Manager Start-Menue anpassen und home-screen (Themen) erstellen - freeware für Smartphone" (interner Link) vorgestellt.
Hintergründe für Symbian-Handys selber erstellen
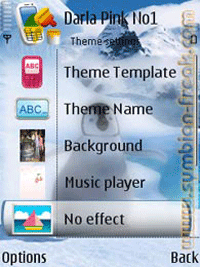
Mit sehr vielen Funktionen ist die freeware "Theme DIY" ausgestattet. Der Vorteil liegt m.E. vor allem darin, dass die Themen mittels dieses kostenlosen Programms direkt auf dem Handy erstellt werden können.


Hat man also ein Foto mit seiner Handy-Kamera geschossen, kann man es so gleich als Hintergrund verwenden (falls nötig, sogar vorher drehen). Auch passende Klingeltöne lassen sich einbinden...


Hat man also ein Foto mit seiner Handy-Kamera geschossen, kann man es so gleich als Hintergrund verwenden (falls nötig, sogar vorher drehen). Auch passende Klingeltöne lassen sich einbinden...
Voraussetzung: Nokia S60 3rd Edition
Anleitung und Download (Quelle der Bilder) unter:
http://www.symbian-freak.com/news/007/01/theme_diy_4_s60.htm
Nokia selbst bietet eigene Software an, die auf dem Computer installiert werden kann. Mit dieser lassen sich eigene Hintergründe (z.B. für den Musik-Player) erstellen, die dann auf das Gerät übertragbar sind. Da wären z.B:
- S60 Theme Studio for Symbian - Voraussetzung: Symbian S60 2nd und 3th Edition - weitere Informationen auch unter:http://www.symbian-freak.com/news/006/09/carbide_ui_s60_theme_edit.htm
- Nokia Series 40 Theme Studio
- Nokia 7710 Theme Studio for Symbian
Diese Programme können im Forum (http://www.forum.nokia.com) gedownloadet werden. Dazu einfach eine "Suche" innerhalb des Forums nach "Tools/SDKs" starten (siehe Bild unten).


Hintergründe und Themen für PDAs selber erstellen
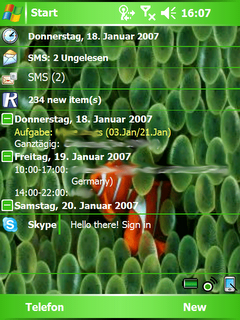
Wer eigene Skins für seinen PDA herstellen möchte, kann dazu die freeware "ThemeGenCE" verwenden.
Hier können Themen erstellt und auch eigene Bilder verwendet werden.
Der Download und ein Tutorial sind zu finden unter:
http://pros.orange.fr/BenThon/IndexEn/IndexEn.htmHier können Themen erstellt und auch eigene Bilder verwendet werden.
Der Download und ein Tutorial sind zu finden unter:
Wer einfach nur an neuen Hintergründen interessiert ist, findet diese auf Portal "pocketPCscreen":
Aus einer Vielzahl von Hintergründen kann man sich auf verschiedenen Seiten das Gewünschte aussuchen.
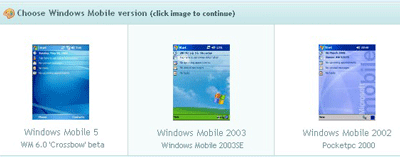
Danach wählt man im zweiten Schritt noch das Betriebssystem des PDAs aus.
Danach wählt man im zweiten Schritt noch das Betriebssystem des PDAs aus.
 Das Einbinden neuer Themen auf einem PDA kann nachgelesen werden unter "newsweek spezial - Hintergrund und Themen für PDA" (interner Link).
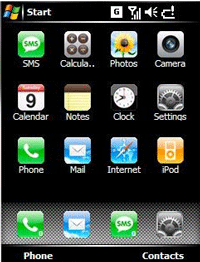
Das fast perfekte Original für Smartphones (mit WindowsMobile 5.0)
 Wer Lust hat, kann ja mal hier nachsehen:
http://www.kolumbus.fi/anders.ruohio/sp.html
[Kein Link, bitte copy & paste]
Ich würde mir ja das vorletzte Thema genauer ansehen...
Das Bild rechts ist nicht von dort!
Das "dreiviertel" Original für den PDA mit freeware
Dafür benötigen wir zuerst die freeware cLaunch. Dieses Programm lässt uns den Today-screen neu gestalten: Es erlaubt nicht nur dort personalisiert Verknüpfungen zum Starten eines Programms anzulegen, sondern auch eigene Bildchen für jede Verknüpfung zu verwenden.
Sprachen: English, French, German, Italian, Spanish, Dutch, Chinese GB
Der Download befindet sich auf der Internetseite:
http://pachome1.pacific.net.sg/~welic/claunch.html
Jetzt müssen wir nur noch "irgendwelche" Bildchen als Button und "irgendeinen" Hintergrund finden.
Tja, wie schön, dass es das Original für Smartphones zum Download gibt (siehe oben) und auch das Original für den PDA (siehe am Ende des posts) - da findet man dann Bildchen und auch den Hintergrund.
Nach dem Entzippen muss man nur die Buttons vom Targa-Format (tga) ins bmp-Format konvertieren, da cLaunch nur dieses Format unterstützt. Die Grösse ist ebenfalls wichitg: Es muss 32x32 Pixel sein.
Das geht wunderbar mit der freeware XnView - sogar im batch-Modus.
Download unter:
http://perso.orange.fr/pierre.g/xnview/de_home.html
 Wer QVGA hat, sollte noch folgendes beachten: If you have cLaunch installed, uncheck it from your Today settings, copy this file to the \Windows directory (you will be asked if you want to copy over the one already there, say yes). Then, re-check cLaunch in your Today settings.
Nachdem man die Bildchen und Hintergründe übertragen hat, muss zunächst cLaunch eingebunden werden. [Die folgende Anleitung bezieht sich auf einen PDA mit WM5.0. - müsste aber für andere Betriebsystheme nachvollziehbar sein.]
Dazu gehen Sie bitte auf "Einstellungen" im Start-Menü und wählen im Reiter "Persönlich" "Heute" aus. Dort öffnen Sie den Reiter "Elemente". Ich empfehle, nicht nur cLaunch zu aktivieren, sondern auch zunächst erst einmal alle anderen "Today-screen-Plugins" zu deaktivieren.
Nicht wundern, cLaunch ermöglicht, dass der today-screen mehrere tabs hat.
Auf den ersten tab sieht man auch cLaunch (ist umrandet). Mittels tab & hold mit dem Stylus auf diesen Bereich kommt man zu den Optionen.
Mittels "Add" kann man Programme hinzufügen, aber auch Verknüpfungen zu Dokumenten und Ordnern (z.B. Speicherkarte). Die shortcuts für Programme können .lnk und .exe sein.Der Download befindet sich auf der Internetseite:
http://pachome1.pacific.net.sg/~welic/claunch.html
Jetzt müssen wir nur noch "irgendwelche" Bildchen als Button und "irgendeinen" Hintergrund finden.
Tja, wie schön, dass es das Original für Smartphones zum Download gibt (siehe oben) und auch das Original für den PDA (siehe am Ende des posts) - da findet man dann Bildchen und auch den Hintergrund.
Nach dem Entzippen muss man nur die Buttons vom Targa-Format (tga) ins bmp-Format konvertieren, da cLaunch nur dieses Format unterstützt. Die Grösse ist ebenfalls wichitg: Es muss 32x32 Pixel sein.
Das geht wunderbar mit der freeware XnView - sogar im batch-Modus.
Download unter:
http://perso.orange.fr/pierre.g/xnview/de_home.html
 Wer QVGA hat, sollte noch folgendes beachten: If you have cLaunch installed, uncheck it from your Today settings, copy this file to the \Windows directory (you will be asked if you want to copy over the one already there, say yes). Then, re-check cLaunch in your Today settings.
Nachdem man die Bildchen und Hintergründe übertragen hat, muss zunächst cLaunch eingebunden werden. [Die folgende Anleitung bezieht sich auf einen PDA mit WM5.0. - müsste aber für andere Betriebsystheme nachvollziehbar sein.]
Dazu gehen Sie bitte auf "Einstellungen" im Start-Menü und wählen im Reiter "Persönlich" "Heute" aus. Dort öffnen Sie den Reiter "Elemente". Ich empfehle, nicht nur cLaunch zu aktivieren, sondern auch zunächst erst einmal alle anderen "Today-screen-Plugins" zu deaktivieren.
Nicht wundern, cLaunch ermöglicht, dass der today-screen mehrere tabs hat.
Auf den ersten tab sieht man auch cLaunch (ist umrandet). Mittels tab & hold mit dem Stylus auf diesen Bereich kommt man zu den Optionen.
persönliche Anmerkung: Weitere nützliche Informationen sind jetzt in englisch, die ich aus mehreren Beiträgen im xda-developers-Forum (http://forum.xda-developers.com) kopiert habe. Eine deutsche Formulierung habe ich mir aus den wohl schon allgemein bekannten Gründen nicht angetan. Da diese von mir verwendeten Beiträge im xda-developers-Forum noch existieren, scheinen sie also "konform" zu sein.
Zunächst müssen die Settings angepasst und danach noch die Ikons für die Verknüpfungen eingebunden werden.
In den Settings geben Sie ein (für 640 x 480 VGA):
- Icon size 32 (very important)
- (check) icon name enable size 45
- (check) Icon name at bottom size 15
- Icon Margins (for VGA) horizontal 5 , vertical 5
- Window Margins left 10, top 15 , right 0, bottom 0
In der Optionen sollte man folgendes eingeben:
- “main” uncheck all groups except main.
- “system” cLaunch height 265
- “tab” uncheck everything. This will remove the lines and tabs and leave only your main screen. To get back into the settings go towards the bottom of the screen and tap and hold in a blank area to bring up the options for cLauncher (since you won’t have a settings icons anymore).
Now, to setup the icons and shortcuts simply go into the options screen of cLauncher by going to the bottom of the screen in a blank area and tap and hold for a second.
Choose “add” and seek the program you wish to make the shortcut. Now go to “change icon” and choose an icon. You’ll need to have loaded 32x32 icons you wish to use in a folder to choose from and they need to be BITMAP icons so when you cut them up, resize and save them, make sure you use bitmap 32x32 size.
cLaunch Optionen im Allgemeinen
Da es vielleicht hilfreich sein kann, habe ich Ihnen ebenfalls aus dem Forum noch einige Anmerkungen in Englisch herauskopiert:
Once in the settings select 'Options'. Options allows you to change how cLaunch appears on the today screen. It's settings affect all the individual tabs in the same manner. It is used to set the height of cLaunch within the today screen and the number of tabs in use. These are the tabs you will see:
Main - Select which Tabs you wish to appear within cLaunch. You may use up to 8 selecting them by placing a tick in the box. You may also overtype the titles and change the tab names as required.
System - Here you may set the height of cLaunch. This dictates how much of the today screen it occupies. It may take some trial and error in order to adjust the height and get the desired affect. 'Menu bar enable' makes the tabs you have selected visible on the screen. You can also tap 'Menu bar at bottom' which will shift the tabs below the cLaunch window instead of being located at the top. 'Settings icon enable' creates a small system access icon at the right hand side of your tabs. This is for quick access to the cLaunch settings. 'Arrow icons enable' adds small arrows within cLaunch in the event that you have more items added to the today screen than can be displayed at once. This icon enables you to scroll through the selected tab. You may also select 'Tap empty spaace advance to next group' which allows you to toggle through your tabs by just tapping the screen.
Tab - These settings all relate to your chosen tabs within cLaunch. Increase tab width if the titles of your tabs are lengthy. You may also select to have a border around the plug-in if desired. The options will place a border around the whole plug-in and and around the tabs. There is also an option for 'Tab border 3D'.
Settings icon - This allows you to skin the settings icon if it was selected within the system settings.You may import your own icon using the file path field. Icon should be 18x18 bitmap.
Help - cLaunch quick tips:
Press the tick in the top right hand corner to exit Options and go back to the main cLaunch tabs page. If you have changed the names of any of the tabs you will be able to see the tabs at the top of the screen. You will see all the tabs even though you may have only selected one or two within Options/Main.
cLaunch Nutzung
The 'Options' relate to the cLaunch settings as a whole, but each tab may also be configured seperately. Make sure that the tab you wish to personalise is selected and tap 'Settings' . These settings relate only to this tab. Here you can set the icon size for the tab, enable or disable the icon name and the height of the text. The 'Margin' tab allows you to organise the icons within the tab.
'Skin' allows you to skin the tab. Note that the skin must be a bitmap and of the correct size. cLaunch will stretch the background if it is too small. 'Skin2' allows you to skin the icons for the arrows.
'Import' allows you to import an entire menu into the selected tab. For example you can import everything from \windows\start menu\programs\. This will save time over adding each item individually.
Once you are happy with your settings you may wish to make some last minute changes to the order of the items within the tab. The main cLaunch page has the options to organise the shortcuts you have added.
Add - Used to add the link to cLaunch.
Edit - Highlight an existing shortcut and select Edit to change the file path or icon.
Delete - Highlight and select delete to remove an shortcut.
Cut - Highlight and select cut to cut a shortcut to the clip board.
Copy - Copy any selected shortcut from desired tab.
Paste - Paste the shortcut you have copied/cut.
Select All - Selects all shortcuts on the visible tab.
Up - Used to arrange the order. Highlight your shortcut and then select Up to move it up the list of shortcuts.
Down - Used to arrange the order. Highlight your shortcut and then select Down to move it down the list of shortcuts.
Select mulitple - Allows you to highlight and pick several shortcuts and deal with them together once selected.
Anpassen der unterschiedlichen Helligkeitsstufen mit freeware für Smartphone und PDA
Um auch die unterschiedlichen Helligkeitsstufen dem "Original" anzupassen:
http://greatbal.blogspot.com/2006/04/basehue-express-for-wm5-devices.html
Voraussetzung: Smartphone WM5 (176x220 and QVGA) und PDA WM5 (QVGA/VGA)
Das Original für den PDA
Wer auf seinem PDA das (!) feeling haben möchte:
Es gibt auch die Möglichkeit, mal auf der Internetseite http://forum.xda-developers.com/showthread.php?t= nachzusehen, wobei man vielleicht nach dem Gleichheitszeichen direkt z.B. noch die Zahl 290282 eingeben kann, damit eine URL vollständig ist.
Allerdings ist dazu wisbar advance 2 und wisbar advance desktop nötig - beides keine freeware.
Aber die Bilder und Hintergründe kann man ja auch für andere Dinge verwenden...
Tipp: click on "free"- you can just download 1 file each 2 minutes, so you have to wait between the downloads...


2 Kommentare:
hallo,
ich habe einen n311 mit WM5/VGA und kann leider claunc nicht richtig nutzen, weil es eigentlich nur für QVGA ist und diese anzeige nur vergrößert. Folge: das hintergrundbild wird vergrößert, die Icons, aber auch vorallem die schrift ist unscharf. konntest du das iwie lösen?
spikeman(at)directbox.com
Hallo,
es stimmt, dass, wenn man nicht nur Icons, sondern auch Schrift anzeigen lassen möchte, dieses nicht im VGA-Modus vernünftig funktioniert:
- the app isn't ready for making the predefined system control panels (inside cplmain.cpl accessible, unlike SPP, iLauncher and BP). However, third-party CPL's can be used without problems.
- on VGA devices, in QVGA mode, it uses pixel doubling in its client area. This may be a showstopper for many.
- it has major Today wallpaper problems on VGA devices, in QVGA mode. Following is an example of using a high-resolution today background image (I used the same test image as in my article on Today wallpapers so that problems like clipping and uneven rendering can be easily spotted):
setting HKEY_CURRENT_USER\ Software\Microsoft\Today\DPI to 96 (to tell the operating system to consider the Today image as a QVGA, low-resolution one; please also see the above-linked article on this registry entry) doesn't change much ? cLaunch will still use pixel doubling".
Quelle (kann vielleicht helfen):
http://forum.brighthand.com/showthread.php?t=216376
Nun gibt es die Möglichkeit, nur Icons zu verwenden (32x32).
Hier wurde auch das Problem gelöst (mit Hilfe von anderen Programmen)
http://www.ppc-welt.info/community/showthread.php?t=41447
Man kann auch "VJToggle II (WM5)" verweden:
http://forum.xda-developers.com/showthread.php?t=243211
Ansonsten würde ich einfach in den erwähnten Foren nach Lösungen fragen...
Ich hoffe, die Antwort kann helfen.
Post a Comment